
Hey EDU Blogs!
In today’s weekly post, I’m going to be teaching you guys how to do calligraphy. I’m very excited to do this tutorial, because calligraphy is one of my hobbies that I absolutely love to do. I think that doing calligraphy calms your mind, and makes you want to try harder in improving your penmanship.
First up, if you don’t know what calligraphy is, it is basically a style of writing that uses special types of pens. There are so many different pens you could use to write in calligraphy. Down below is a list of SOME pens you could use.
- Regular brush pens
- Fountain pens
- Markers
- Watercolor brushes
That is about all that I can think of. Normally, people write calligraphy in cursive font. Sometimes, (rarely though) people write in print or capital letters.
To be considered writing in calligraphy, you have to follow these rules.
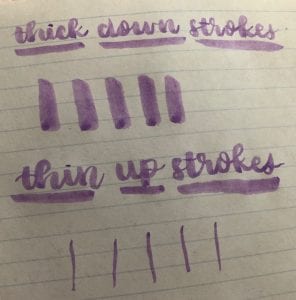
1) Always make the downstrokes of a letter thick.
2) Always make the upstrokes of a letter thin.
3) When making thin strokes, put very light pressure in your fingers and pen.
4) When making down strokes, but kind of a lot of pressure in your fingers and pen.
5) Connect the letters of the work you’re trying to write slightly at all times. (Even if you’re writing in print!)
Those are probably not all the rules there are, but try to follow them!
Here are some things you can do to improve calligraphy skills. (The second picture is just for fun haha.)
(By the way, I am using the Kuretake clean colors brush pen set!)

Sorry that this post was a bit short guys. I promise next week’s one will be longer! I hope you learned more about calligraphy, and you can watch more tutorials on youtube / online too.
 Have a nice day!🍀
-hmsrimi✨